Hello chard fans!
Three slices of food related news today. First, the most exciting: Magnum bars have officially landed in the United States! For those of you who have not experienced these AMAZING treats, previously they were only sold in Europe and Mexico (I think I ate them at least everyday I was traveling in those locations) and they are to die for. Recently, I was tipped off by Lord of the Chard's fellow contributor, Leanne, that Magnum bars had surfaced at a store in CA. That was all the info I needed to start my search. Excitingly, I spotted them at my favorite Safeway. Four different flavors, and believe me, the Longoria house will be trying them all.
Secondly, spring has finally sprung here. Yesterday the clouds parted and it was sunny all day. Daniel and I worked on readying the raised garden beds for planting season. I found out that I can plant peas now, so I purchased seeds yesterday. I will need to wait till the beginning of May to plant most everything else. Anyone have suggestions of something weird or interesting I should plant?
Lastly, I have a confession. I love reading old weird cookbooks. From 1970's meat and jello salads to Amish barn raising recipes, I love them all. My mom found a cookbook in an antique store titled An Encyclopedia of Country Living: Old Fashioned Recipe Book. Published in 1981, this book helps the "city" dweller transform and simplify their lives. Topics include: drying and smoking meats, soap making, tanning leather, making your own cosmetics and the frequency of bathing in the winter (once a week). It is hilarious, but also has some wonderful recipes and gardening tips. Plus, as Elle and I grew up enjoying homemade yogurt and eating canned everything, I love a good "back to basic" recipe. So I thought that I would share a recipe that everyone could adapt for their particular city, when you live off the land, you eat what you hunt:
Mouse Pie
1 c. macaroni
1 medium can of tomatoes
1 onion, chopped
5 fat field mice (E-you could use fat city rats)
Salt and Pepper
1 c. cracker crumbs
I will skip the instructions but basically you toss the mice in with the macaroni and bake until the mice are "well-done". The funniest part: the recipe was contributed from a Yakima farmer. I think that I might avoid this one.
We like to make chips out of vegetables, grow our own tomatoes, and clean with vinegar.
stripes
Tuesday, March 29, 2011
Friday, March 25, 2011
Whenever Bread
Things have been rough this week at Lord of the Chard's northeastern headquarters. We have had chemistry midterms, toothaches, and snow! TWICE! SNOW TWICE THIS WEEK! This bread has helped me persevere.
Unlike Leanne and Laura, I sadly do not have my own bread machine. I have tried a lot of homemade bread recipes, and honestly a lot of them were not worth the effort - trader Joe's makes a great whole wheat tuscan pane that is giant and costs something like $1.99. But this no timetable bread IS worth it. Now it takes a long time, I am not going to lie. But 98% of that time is rising time and there is very little work involved. It might seem like a lot of work, but it is really easy and you basically can't ruin the bread. All of the rising time is subjective and you can just do whatever works for your schedule.The original recipe from Smitten Kitchen (one of my favorite food blogs) is here, but I found the recipe a little confusing and changed some of the steps so my version is below.
Ingredients:
1.5 c AP flour
2 c whole wheat flour
2 t ground flax seed (optional but an awesome addition FIBER!)
0.5 t sugar
0.5 t active dry yeast
1 c H2O
0.5 c milk (I used soy milk because I never have real milk on hand and it worked fine)
extra flour for kneading
1. Mix your flours, flax, and sugar together in large bowl.
2. Separately mix lukewarm H2O, milk and yeast. Add the liquid to the flour and mix it up.
3. I learned this tip from Alton Brown (I think?): Let it hang out in the bowl for a little while (10-15 minutes). This gives the flour time to absorb the water and softens the wheat grains.
4. Knead for a little while, say 5 minutes and then roll in flour and put it into a bowl to rise.
5. I usually put it together after dinner and let it rise overnight. The long rise time will make this the fluffiest, most flavorful homemade bread.
6. Whenever you get back to it knead it again, and then put it back into the bowl to rise. I do this is the morning before I leave for school.
7. When you get back to it, punch it down, knead it again and shape into loaf.
8. I usually let it sit for one final rise once I have it in the pan. Brush with either water or egg white and pop it in the oven at 450 degrees for 30 minutes.
9. The Smitten Kitchen recipe says to turn the oven down to 425 and cook for another 5-20 minutes, but I have found mine done after the 30.
Unlike Leanne and Laura, I sadly do not have my own bread machine. I have tried a lot of homemade bread recipes, and honestly a lot of them were not worth the effort - trader Joe's makes a great whole wheat tuscan pane that is giant and costs something like $1.99. But this no timetable bread IS worth it. Now it takes a long time, I am not going to lie. But 98% of that time is rising time and there is very little work involved. It might seem like a lot of work, but it is really easy and you basically can't ruin the bread. All of the rising time is subjective and you can just do whatever works for your schedule.The original recipe from Smitten Kitchen (one of my favorite food blogs) is here, but I found the recipe a little confusing and changed some of the steps so my version is below.
Dough after rising overnight.
How I roll up my loaf: First stretch out the dough into a rectangle shape.
Then just roll it up like a giant cinnamon bun.
Until you get to the end. There smush the seam together.
And place it seam side down into your bread pan. I use a 9x5 loaf.
The finished product. Note that I was unable to display self control and had a slice off the end before I snapped a photo!
Hello lovely.
When it snows the first day of spring all you can do is eat bread fresh from the oven with split pea potato soup in your pajama pants.
Ingredients:
1.5 c AP flour
2 c whole wheat flour
2 t ground flax seed (optional but an awesome addition FIBER!)
0.5 t sugar
0.5 t active dry yeast
1 c H2O
0.5 c milk (I used soy milk because I never have real milk on hand and it worked fine)
extra flour for kneading
1. Mix your flours, flax, and sugar together in large bowl.
2. Separately mix lukewarm H2O, milk and yeast. Add the liquid to the flour and mix it up.
3. I learned this tip from Alton Brown (I think?): Let it hang out in the bowl for a little while (10-15 minutes). This gives the flour time to absorb the water and softens the wheat grains.
4. Knead for a little while, say 5 minutes and then roll in flour and put it into a bowl to rise.
5. I usually put it together after dinner and let it rise overnight. The long rise time will make this the fluffiest, most flavorful homemade bread.
6. Whenever you get back to it knead it again, and then put it back into the bowl to rise. I do this is the morning before I leave for school.
7. When you get back to it, punch it down, knead it again and shape into loaf.
8. I usually let it sit for one final rise once I have it in the pan. Brush with either water or egg white and pop it in the oven at 450 degrees for 30 minutes.
9. The Smitten Kitchen recipe says to turn the oven down to 425 and cook for another 5-20 minutes, but I have found mine done after the 30.
Friday, March 18, 2011
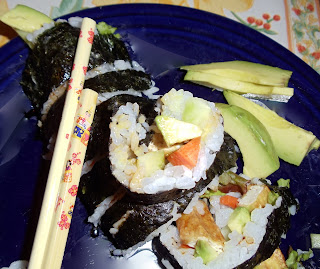
Eho-Maki
Happy (almost) spring! To celebrate the end of winter, the Longoria family celebrated Setsubun, a Japanese holiday that marks the beginning of spring in Japan. There are many parts of Setsubun that sound fun to participate in, especially throwing beans at a family member dressed in masks (to scare away the demon Oni). But since it is just Daniel, Moses, Atticus and I, we decided that we would skip the bean throwing this year and make a traditional Eho-Maki.
Eho-Maki means "the lucky direction roll", which explains more about how to eat the sushi rather than what it is...so let us start with the recipe.
My friend Yoko uses the following ingredients when making her family's Eho-Maki:
Nori Sheets
Sushi rice
Avocado
Lettuce
Crab legs (I just used carrots)
Cucumber
Egg (I made fried tofu spears)
Daikon Radishes (I found these at our Asian grocery store, but they are GIANT and super expensive...I liked the taste, sort of pickled, but I knew Daniel would not like it)I have never made my own sushi rice before, but it was easy and tasted just like a restaurant version.
To make 4 medium-sized sushi roll portions of rice:
1 1/3 cups short grained white rice
2 cups water
1/4 cup rice vinegar
2 teaspoon vegetable oil
1 1/2 tablespoons white sugar
1/2 teaspoon salt
Wash the rice until the water runs clear. Combine rice and water and bring to a boil. After the rice has reached a boil, turn the temperature to low and cover. Cook for 20 minutes. Cool rice for 10-15 minutes. While rice is cooking combine the remaining ingredients into a small bowl and microwave for 30 seconds until sugar is dissolved. Pour mixture over the cooled rice. Stir until the liquid is well incorporated into the rice.
The next step, anyone can do...spoon the rice over the nori sheet, add your favorite additions and attempt to roll them up. Yoko did this much better than I. Mine looked reminiscent of a burrito.
Here is the fun part: every year Japan has a lucky direction (something to do with the zodiac sign), this year is south-east. After you have given up trying to make your sushi roll pretty, and decide just to eat it, you hold the roll toward the lucky direction and make a wish while you eat the ENTIRE roll of sushi without talking.
We found this to be impossible, so post wish-making, we decided to cut it up. My only suggestions would be to know which brands of nori are the best (ours was too fishy for me) and make sure you have wasabi and ginger on hand!
Nom nom, take that Oni!
Monday, March 14, 2011
You Will Like This Tofu
Is there any other food as polarizing as tofu? Cilantro perhaps (spoiler: cilantro is the worst thing about everything) but I can't think of many others. Let me say this right off the bat: tofu can be completely disgusting. I don't know anyone who like a wiggly giggly block of flavorless mush. But it can also be really flavorful and have an interesting texture if prepared correctly.
I used to go through a big routine to sauté tofu on the stovetop, first pressing, then marinating, then dredging in spices and cornstarch, blah, blah, blah. Way too much work. The following is my new and improved tofu method. Much easier and I find myself having this a couple of times a week. I urge even those adverse to the big block of bean curd to give it a try. It might seem like it takes a while, but most of it is inactive time so you can do other things while you wait.
Baked Tofu
(Makes enough for 2 medium servings)
First gather your ingredients!
0.5 block of extra firm tofu
1 T olive oil
1 T soy sauce
1 T veggie worcheshire sauce (or non veggie if you want)
Paprika
Garlic powder
Black pepper
Since your tofu has been sitting in a water bath for awhile you need to press all of that excess liquid out of it. I skipped this step for years as it seemed annoying and pointless - but this is the key to great tofu! I cut my block in half and save one half for later. I then cut the half I am using into 3 pieces and lay them out on paper towels.
Put more paper towels on top and then add a cutting board or other flat surface and some weight to press out the water. My setup looks like this:
Now go do something else for a half hour or so. Check back and change the towels if necessary. While you wait you can prepare the marinade. Take all of your ingredients from above and combine with a whisk. Obviously the spices are subjective and you can add as much or as little as you want. Also feel free to put in whatever combo your heart desires. This is just my favorite combo. Make sure you have the oil and soy sauce included.
Is your tofu done pressing? Good! Cut it up into bite size pieces and toss with the marinade. Let them hang out for 15 minutes or so. Preheat the oven to 375 degrees F.
Nom nom nom
To cook the tofu I recommend lining your baking sheet with tin foil. The marinade can make a mess and I'm not too keen on scrubbing my dishes for hours so I go for easy cleanup. Place your marinaded tofu bites on the baking sheet and bake them for 25-30 minutes. You should turn them over half way through to make sure they bake evenly.
I am roasting this batch alongside some brussels sprouts!
Keep a close eye on them because they can burn quickly. I tend to like mine a cooked a bit on the longer side. Tonight I had mine with brussels sprouts over whole wheat cous cous with a side of roasted carrots.
To tofu skeptics: I know the reputation of tofu, but believe me, this doesn't taste like the tofu you are used to. It is very flavorful because you pressed the tofu allowing it to soak up the marinade like a sponge. Just as important, baking it has given it a chewy interesting texture that makes you completely forget its past life as a big boring glob. You won't be disappointed.
Meet my new friend Calvin
Please say hello to the newest member of the Longoria family, Calvin the counter top composter. I have been lusting after one of these beauts for a couple of months now: I am very good about composting in the summer, but in the winter I am lazy (too many excuses: I am wearing slippers, it is snowy, it is raining, the mountain dog will jump on me with his muddy paws, etc.). I figured I would wait and just ask for one for my birthday. But then...I spotted Calvin at TJ Maxx for only $14.99. As the fates had it, I happened to have $16 buckaroos in my wallet courtesy of book buyback money (let's not mention how much that book cost me in the first place or the fact that I literally did NOT open it this entire quarter...sigh). Anyway, Calvin accompanied me home and got right to work. To test the "stinkyness" level, I have used him for about a week without emptying the contents into the backyard composter. So far so good, the charcoal filters have been doing their job. No smell from the egg shells, potato skins, suspect slimy lettuce leaves, or coffee grinds have been detected. Calvin is here to stay!
Saturday, March 12, 2011
Cinnamon Raisin Bread
I love baking with my bread machine. It turns something that is normally labor-intensive and time consuming, into something easy!. I have an Oster 2lb breadmaker, bake bread weekly, and am very happy with this machine.
Here is my adaptation of Oster's "Springtime Favorite Bread":
Measure and place in bread pan:
1 cup water (room temp)
1/4 cup room temperature butter
2 teaspoons vanilla extract
1 1/4 teaspoons almond extract
In a separate bowl, sift together:
2 3/4 cups bread flour
1 cup whole wheat flour
1/2 cup sugar
2 Tablespoons (more if you like!) cinnamon
Pour dry ingredients into bread pan.
Create a well in the dry ingredients with your finger, and carefully add 2 teaspoons of active dry yeast to the well.
If your bread machine has a "sweet" setting, use that one. Select crust setting, I like a dark crust. Push "start!"
At the raisin/nut signal, add 3/4 cup raisins.
In my opinion, this bread is best toasted with butter and honey.
Friday, March 11, 2011
Chocolate Cream Pie
Fair warning: this is not a healthy-fied recipe.
I let Daniel pick out what dessert he wanted this year. He said he wanted a chocolate pie. I searched through my "fancy" cookbook section and found this recipe in The Gourmet Cookbook by Williams and Sonoma. It is described as a "adult and utterly pleasing" chocolate pie.
Chocolate Cream Pie
For Crust:
1 1/3 C. chocolate wafer crumbs
5 T. unsalted butter
1/4 C. sugar
Filling:
2/3 C. sugar
1/4 C. cornstarch
1/2 t. salt
4 large egg yolks
3 C. whole milk
5 oz. quality bittersweet chocolate
2 oz. unsweetened chocolate
2 T. unsalted butter, softened
1 t. vanilla extract
Make the crust: Preheat oven to 350 degrees. Butter a 9-inch pie plate. Stir together crumbs, butter and sugar in a bowl with a fork until well combined. Press mixture evenly onto bottom and up sides of the pie plate. Bake crust until crisp, about 15 minutes. Cool completely on a rack.
Make the filling: Whisk together sugar, cornstarch, salt, and yolks in a heavy sauce pan until well combined.
Add milk in a slow stream, whisking constantly. Bring to boil over moderate heat, whisking, then reduce heat and simmer, whisking, for 1 minute (filling will turn very thick fast).
Melt chocolates in a small bowl, and stir until smooth. Whisk chocolate, butter and vanilla into filling. Cover surface of filling with a piece of buttered wax paper and cool completely, about 2 hours. Spoon filling into crust and smooth top. Refrigerate, covered, for at least 6 hours.
Some comments about making this:
It took a veerrryyyy long time. I do not have enough patience to whisk for 20 minutes straight.
I realized that I am not very good a separating eggs. I am going to make scrambled egg whites (with the addition of a broken yolk) tomorrow morning with the leftovers.
I am excited about trying it, for all the work, it better be yummy!
Wednesday, March 9, 2011
Less Egg Frittata
Recently I have been trying to eat more eggs. I have been doing more strength training (I can almost do a pull-up!) and have been looking for different ways to up my protein. I eat a lot of beans and tofu but, well, that can get quite boring. Eggs seem like a versatile source of protein but I have never been big on them. Their smell, their wobbly goobly consistency... I've just never been a fan.
In any case I found this recipe for a frittata that seemed like it might be a gateway egg dish. And it was great! I had never made a frittata before so I used a pan that was way too big and had to smoosh all of it to the side to cook, but it still tasted fantastic. For my veggies I used green beans, edamame, corn, spinach, and potatoes. I cooked the potatoes a bit before adding them to make sure they got cooked all of the way through. I also added goat cheese and Sunny Paris which is my current favorite penzeys spice.
I ended up cooking it for more like 13 minutes just because I wanted to make sure there was no wobbly gooblyness, but for those of you more comfortable with egginess I am sure the 10 recommended minutes would be fine.
Not wobbly goobly!
Do you all have any good egg dishes I should try? I made a mayo free egg salad sandwich the other day and did NOT enjoy it. What is your favorite way to have eggs?
Sunday, March 6, 2011
Carrot Cake Cupcakes
No one knew these gems were not full fat and my book club scarfed them down like they were going out of style. I took an Ina recipe and tried to make it a bit less naughty. You could probably even tip the flour ratio in favor of whole wheat and not be any worse for wear. Next time I will try 1/2 AP flour and 1 1/2 cups whole wheat.
Ingredients
Ingredients
- 2 cups sugar
- 2/3 cups vegetable oil
- 1/2 cup non fat plain yogurt
- 1 teaspoon vanilla extract
- 3 eggs
- 1 cup all purpose flour
- 1 cup whole wheat flour
- 2 teaspoons ground cinnamon
- 2 teaspoons baking soda
- 1 teaspoon salt
- 3 1/2 cups grated carrots
For the frosting
- 8 oz low fat cream cheese at room temp
- 4 oz unsalted butter at room temp
- 1 generous teaspoon vanilla extract
- 1/2 cup confectioners' sugar
Directions:
- Preheat oven to 350 degrees F
- Beat sugar, oil, yogurt, and vanilla together in large bowl
- Add eggs, one at a time
- In another bowl, sift the flour, cinnamon, baking soda, and salt
- Add the wet ingredients to the dry and mix well
- Add the grated carrots and mix until just combined
- Line muffin pans with paper liners. Scoop the batter into muffin cups until each in 3/4 full.
- Bake at 350 14 - 18 minutes (mine took more like 20)
For frosting: Cream together cream cheese, butter and vanilla. Beat in the sugar until smooth
Subscribe to:
Posts (Atom)